Potato & Jalapeño Waffles (VG, GF)

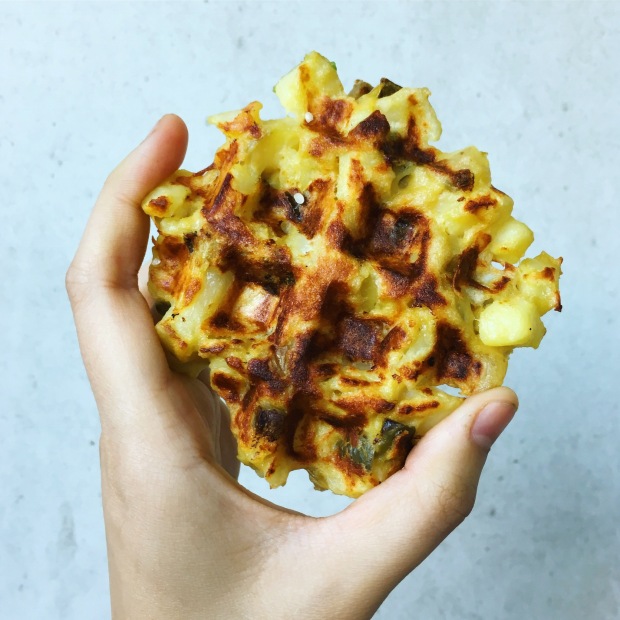
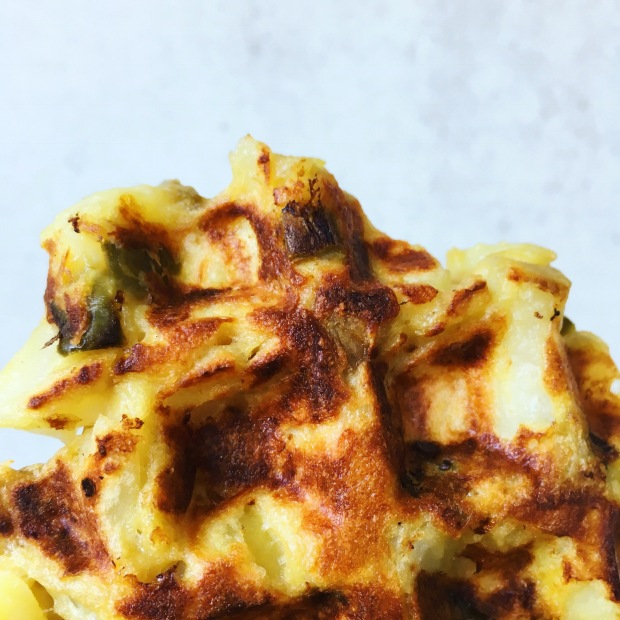
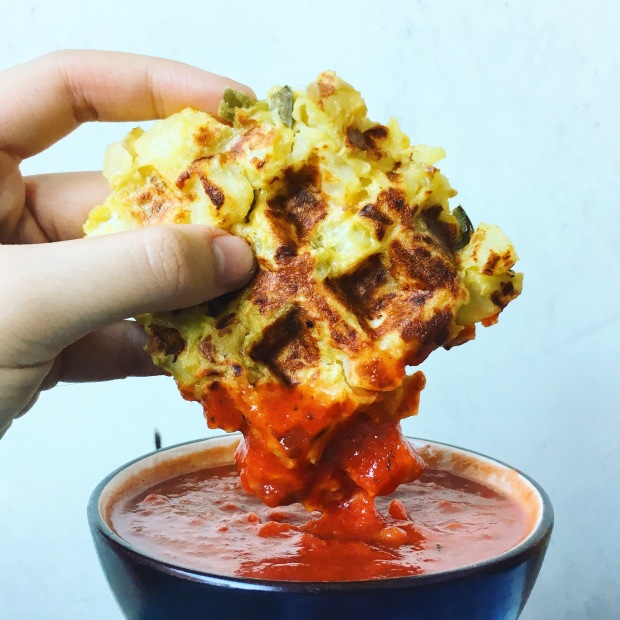
Piping hot, fluffy insides, crispy outside, noochy & savoury with spicy & tangy jalapeño bits…

I know I just said a bunch of adjectives hahaha. Just know that it’s DEEELICIOUS!

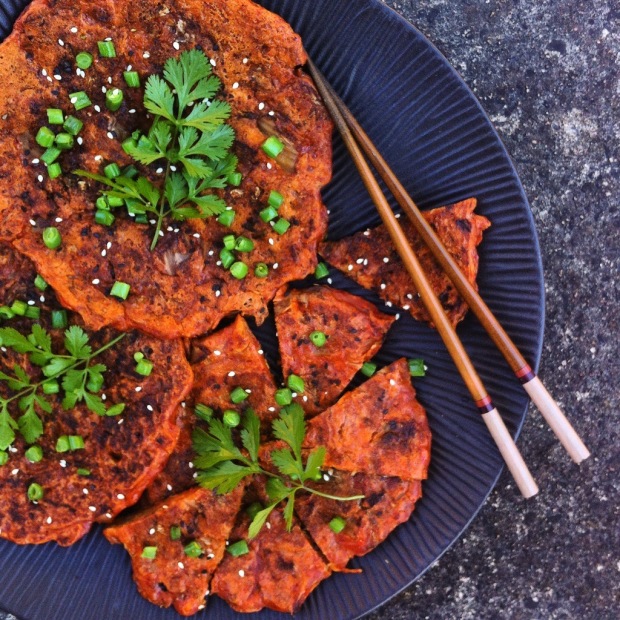
I’m absolutely addicted to these! They’re basically hash browns but wafflelised & spicy!

There is no saturated fat or oil used in the waffles themselves. The only oil used is unrefined coconut oil – and that’s for greasing the waffle iron.

The cooking device? I used a non-stick Belgian Waffle maker (Mine is a Cuisinart 4 Slice Belgium Waffle Maker). The deep pockets are perfect for potato waffles that are chunky/have texture!

To adjust the spiciness level, I would suggest using:

zero: 1 cup frozen peas (add these to the boiling potatoes 2 mins before they are cooked)

mild: 8 pickled jalapeños

spicy: 12 pickled jalapeños

extra spicy: 15 pickled jalapeños + 1/2 tbsp pickled jalapeño juice (I love spicy foods so this is the level the recipe is at.)

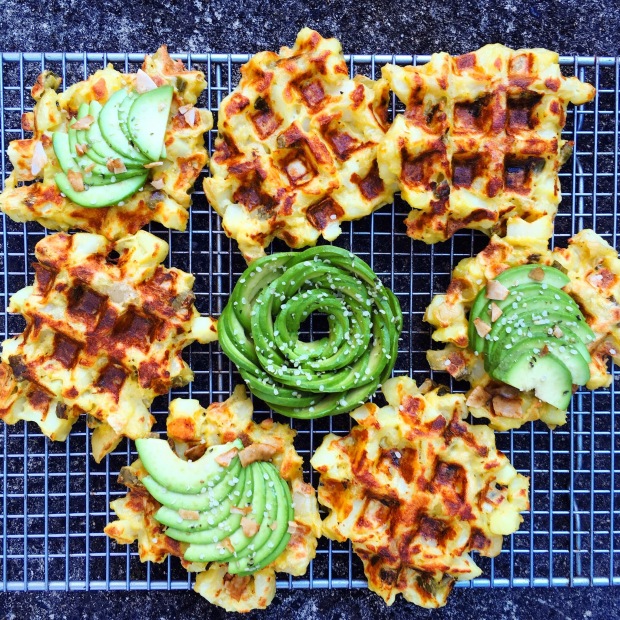
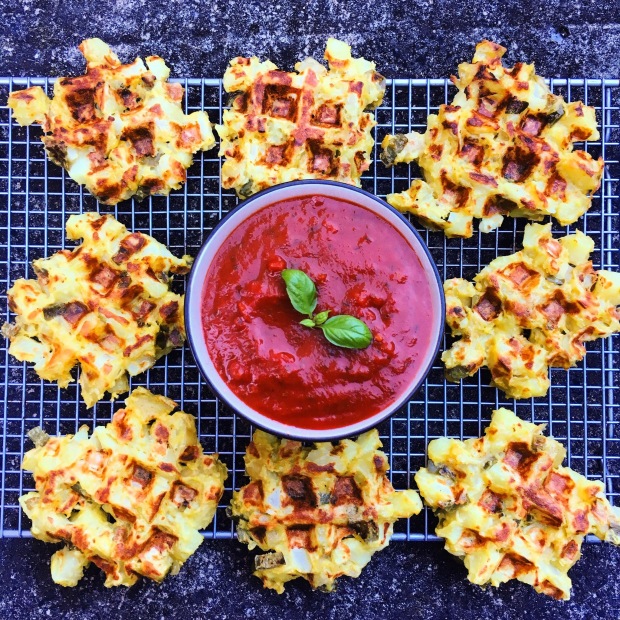
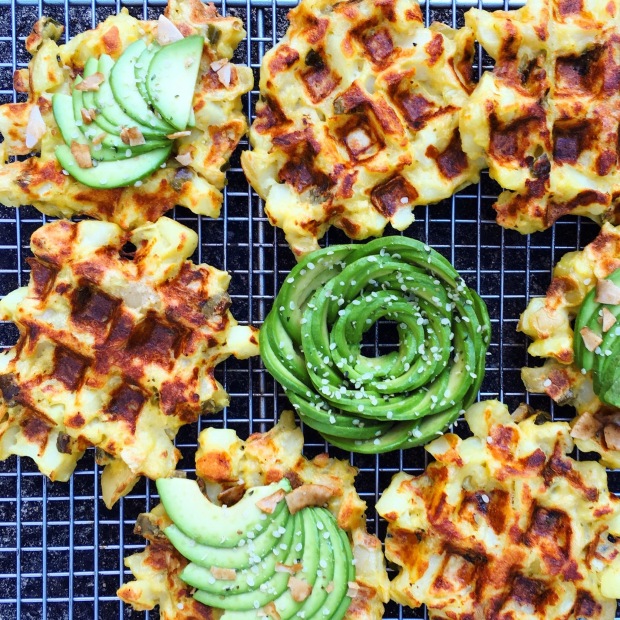
Toppings and sauce are optional but highly recommended; they will bring some variation of flavour & texture to the waffles.

I’ve used avo, hemp & coconut bacon for creaminess and crunch. I’ve also dipped waffles in a herby tomato sauce. Both super simple and delicious! Both of these options also help cut through the spiciness/tanginess of the jalapeños.

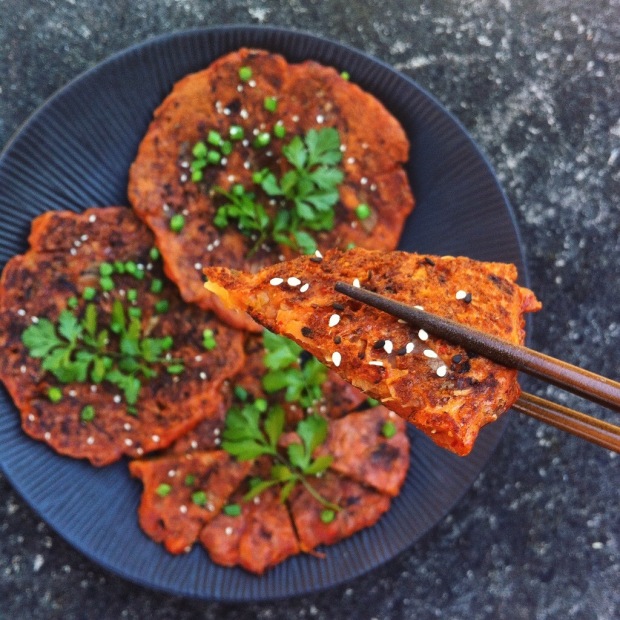
Enjoy them fresh out of the waffle iron – try not to burn your fingers!

If you don’t manage to eat all your waffles right away, I highly highly recommend toasting them! Waffles (whether sweet or savoury) so get soggy/limp quite easily. You can heat them up again in your waffle maker, BUT the absolute BEST way to get warm is to just pop them in your toaster – after 3+ minutes, they’ll be crispier than before and piping hot again!

IMG_0124IMG_0126IMG_0125IMG_0136IMG_0137IMG_0131IMG_0134IMG_0123IMG_0133Simplicity: 4/5     Deliciousness: 4.5/5     Nutrition: 3/5

Makes 8 medium sized Belgium waffles

Ingredients

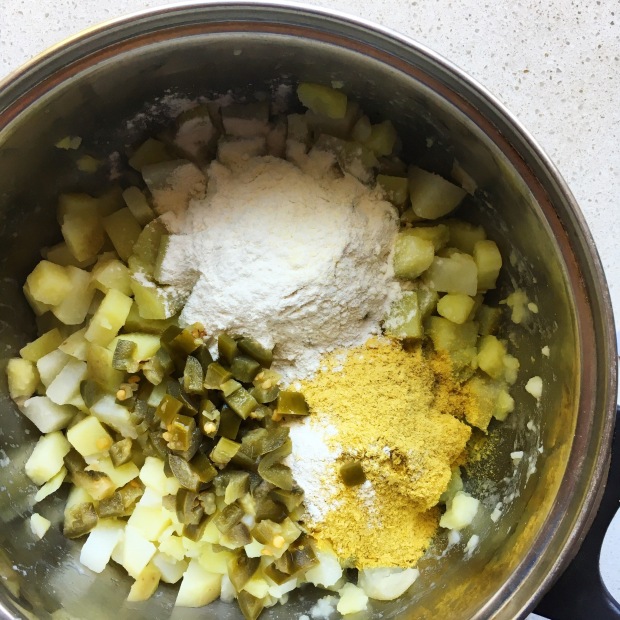
  • 4 cups medium cubed potatoes (washed)
  • 1/4 tsp + 1/2 tsp Himalayan pink salt
  • 1/4 cup nutritional yeast
  • 1/2 cup gluten free plain flour (If you’re fine with gluten, just use plain flour)
  • 15 pickled jalapeños rings (small diced)
  • 3 tbsp unsweetened almond milk
  • 1 tbsp pickled jalapeño juice (optional)

Method

  1. In a pot of boiling water, add the potatoes + 1/4 tsp Himalayan pink salt. Stir. Cook on high heat for 10 minutes.
  2. Turn off the heat. Drain the potatoes in a colander.
  3. Rinse off any foam/scum from the pot. Then place the cooked potatoes back into the pot.
  4. Turn on your Belgian waffle maker to mid – high heat.
  5. Add 1/2 tsp Himalayan pink salt, nutritional yeast, gluten free flour and diced pickled jalapeños to the pot. Mix.
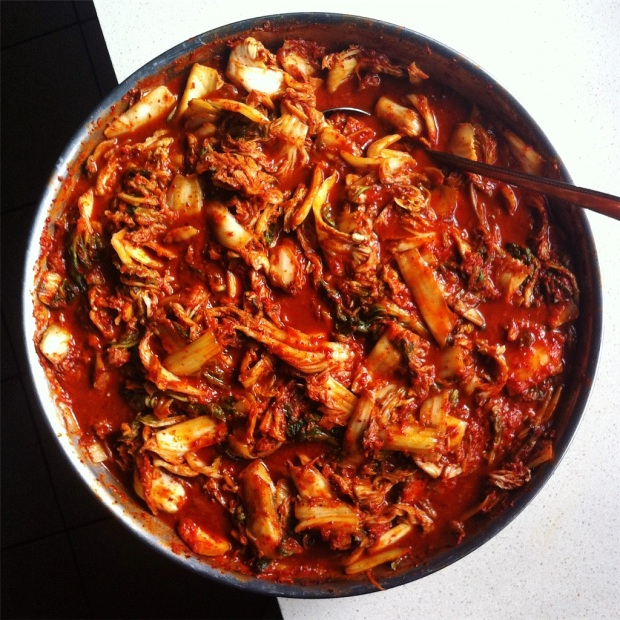
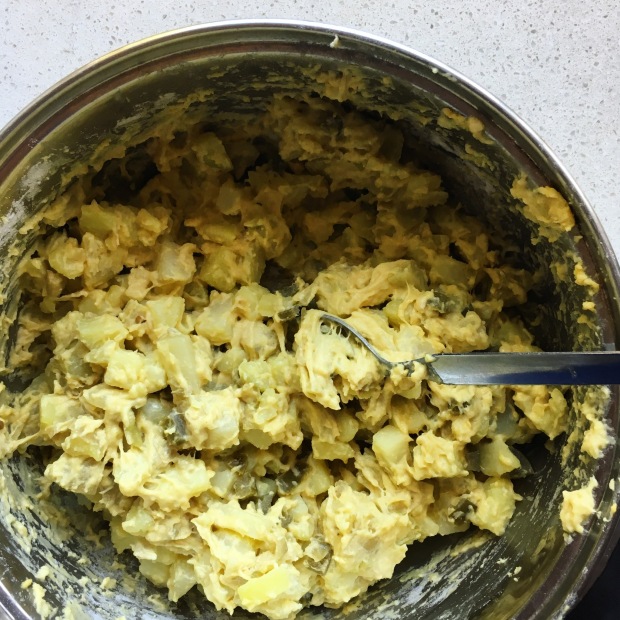
  6. Add the remaining ingredients and stir until well combined. The mixture should be sticky (see above photos).
  7. Your Belgian waffle iron should be hot now. If you can adjust the heat, turn the heat of medium (a super hot waffle iron will just burn the bottom of your waffles). Grease your waffle iron (I used unrefined organic coconut oil + paper towel).
  8. Scoop the mixture onto the waffle iron to desired size& thickness. Lightly press down and spread evenly – you do not want to see gaps in the middle! Then close the lid.
  9. Cook until golden brown. Flip them when you’re happy with the colour to crisp them up a little more. Serve immediately for maximum crispiness. ENJOY!

Notes

>> The cooking time until golden brownness will differ slightly depending on the brand, type and heat level of your Belgian waffle maker.

Open the lid and check the colour of the bottom of the waffles after 5 minutes – if not, close the lid and check again every 2 minutes until you’re satisfied.

Use nonstick tongs to check! You don’t want to scratch the coating of your waffle iron.

My waffles are cold, limp and soggy 😦  What can I do?

TOAST THEM!

The absolute BEST way to get the limp waffles hot & crispy again is to pop them in your toaster. After 3+ minutes, they’ll be crispier than before and piping hot again!

Cruelty Free Kimchi Pancakes (VG, GF)

SPICY, TANGY, CRISPY, CHEWY ~
drooling yet? 

Ahahaha I lovelovelove these savoury slabs of deliciousness 😋😋 top them with coriander, beans & sesame seeds >> savour the spiciness/tang/crisp/chewiness of the kimchi pancake + clean/juiciness of the beans ~ Mmmmm!

While kimchi pancakes seem okay to order at Korean restaurants – DON’T ! ! !

Unfortunately the kimchi itself most likely contains seafood products (fish sauce, shrimp) 

I highly recommend making your own kimchi ~ check out my recipe for Cruelty Free Kimchi. It’s vegan, gluten free, oil free AND allium free (no onion/garlic/leek/chives).

The process of making your own kimchi is actually quite simple & very satisfying – plus it’s good for your gut guys 😏

Really the hardest part about making kimchi pancakes is waiting for the batter to cook & crisp up! 😉

I’m crazy for kimchi ♥  ♥  ♥

photo 4img_5568img_0070Simplicity: 3.5/5     Deliciousness: 4/5     Nutrition: 3/5

Makes 3 large kimchi pancakes.

Ingredients

  • 2 cups vegan kimchi
  • 4 tbsp kimchi juice
  • 1 tsp coconut sugar
  • 1/2 tsp salt
  • 1/2 cup rice flour
  • 1/2 cup gluten free flour
  • 1/2 cup water
  • olive oil
  • {optional] toppings (green beans, coriander, sesame seeds)


Method

  1. Roughly dice the kimchi to about the size of a ring or coin (not too small as you want the pancake to have texture)
  2. Add the chopped kimchi to a medium sized mixing bowl
  3. Add the remaining ingredients and mix with a spoon until well combined – make sure you there aren’t any white bits (flour)! The colour should be an off looking orange/pink.
  4. Heat up a medium sized non stick frying pan. Lightly oil the pan.
  5. When the pan is hot, turn the heat to the lowest possible setting. Then scoop about 1/3 of the pancake batter in and evenly spread out with a spoon to form a roundish shape. You want the pancake to be about 1 – 1.5 cm thin (too thick = inside undercooked).
  6. Cover the pan with a lid and leave to cook until the bottom of the pancake is firm/crispy. It takes about 7-8 minutes for me but it will differ for everyone (depends on the intensity of the heat + type of pan used)!
  7. When the bottom is cooked, carefully/quickly flip. Press down on the pancake. Then cover again with a lid to cook until firm & crispy. It takes about 5 minutes for me.
  8. Flip the pancake again, press down (listen to the sizzle!) and leave to cook uncovered for 2 minutes. Flip again, press down and cook for another 2 minutes.
  9. Remove from the pan into the chopping board. Slice into smaller pieces.
  10. Enjoy! It definitely tastes the most delicious freshly cooked & hot! Repeat step 5-8 for the remaining pancake batter.
  11. {optional} Dice green beans, boil until tender, drain and place on top of kimchi pancakes ~


Cruelty Free Kimchi (VG, GF)

You’re probably wondering ‘what is cruelty free kimchi’?  It’s kimchi without the animal products! 😄

Kimchi usually contains shrimp, fish and loooooads of garlic. Fermented seafood + cabbage? Um no thanks.

Gluten free, oil free & allium free (no onion/garlic/leek/chives) ~

I prefer my kimchi spicy, juicy and tangy. 😘

So the ratios I use are reflective of my preferences. If you prefer less spicy or tangy flavour, refer to the notes below!

Making homemade kimchi is not difficult! However, it does take some time and effort ~ after all, it is a fermented food. 😉

I have broken down the recipe and ratios for one cabbage. I always make MASSIVE batches of kimchi (big family plus I always give it out to friends).

The photos (2, 3 and 4) show the latest batch I made (I used 4 napa cabbages = 4 times the recipe). I recommend you follow the recipe and make an adjustments to your preferences the next time  😋

Note that the longer you ferment the kimchi, the more prominent the sour taste. 😏

The following ratios are for one cabbage. ♥

photo 2-2photo 2photo 5-1photo 4-1photo 3Simplicity: 3.5/5     Deliciousness: 4/5     Nutrition: 3.5/5

Ingredients

  • 1 napa cabbage/wombok
  • 1/2 cup salt
  • 1/2 cup glutinous rice flour/sweet rice flour
  • 3 cups water
  • 1/4 cup brown sugar
  • 1/2 cup vegan fish sauce
  • 1 cup korean hot pepper flakes
  • 1 large one-inch piece of ginger
  • 150g Japanese daikon/white radish


Method

CABBAGE

  1. Slice the cabbage into quarters (halve, then halve each half). Remove the bottoms (the core) of each quarter – discard or leave aside for composting
  2. Roughly chop the cabbage into bite-sized pieces. The stems (whiter bit of the cabbage) should be about ½ size of a card while the leaves (greener bit of the cabbage) can be cut bigger.
  3. Wash the cabbage to remove dirt and sand. Then pat dry the cabbage.
  4. In a large bowl or your sink, place a layer of cabbage. Sprinkle a tablespoon of salt all over. Using your hands, throroughly rub the salt into the cabbage pieces – more salt should rubbed into the stems. Repeat this process for the remaining cabbage & salt.
  5. Set aside for 1½ hours. When that time has elapsed, turn the pieces of cabbage over. Set aside for another 1½ hours.
  6. At the this point, the volume of the cabbage will be significantly less and the texture of the pieces will be softer and more flexible. Rinse 3 times in cold water.
  7. Set aside in a colander to drip dry.


KIMCHI PASTE

1. In a medium-sized pot, whisk the glutinous rice flour with the water. Then cook on a medium high heat, stirring slowly but continously.

2. When the mixture bubbles, add the sugar and stir. When the sugar has dissolved, turn off the heat and allow the mixture to cool down.

3. When the mixture has cooled, pour into a blender/food processor.Add the vegan fish sauce, korean hot pepper flakes. Also roughly chop the ginger into smaller/blendable pieces and add to the mixture.

4. Process until well combined. The mixture should turn bright dark red and be rather thick. Then pour the kimchi paste into a large mixing bowl.

5. Wash the daikon to remove any dirt. Using a peeler, remove the skin of the daikon. Then chop off the top of the daikon.

6. Using a grater, shred the daikon into thin pieces (like matchsticks).

>> Because the daikon has high water content, this process will be rather wet/sloppy. Watch your fingers! When you’ve shredded as much of the daikon possible (without shredding your fingers), thinly slice the remaining piece.

7. Take a handful of the shredded daikon and squeeze as much liquid as you can out. Then add to the kimchi paste. Repeat this step for the remaining daikon. I recommend doing this next to a sink. Using a serving spoon, mix the daikon into the kimchi paste.

8. Repeat step 7 for the cabbage (squeeze, add to paste, mix). The reason for all this squeezing is to minimise the amount of liquid that will water down the kimchi paste. The daikon and cabbage pieces will continue to let out liquid during the fermentation process.

9. When the kimchi paste and cabbage is well combined (meaning each piece of cabbage is well coated in the paste), set aside for 6 hours. Note that the kimchi at this point will be rather thick and have little juice.

10. After the 6 hours have elapsed, you will the notice that the kimchi is a lot juicer than before. Transfer the kimchi into clean jars/containers.

>> I recommend using a wide-mouth funnel if you are transferring the kimchi into jars to minimise mess.

11. Do not fill the jars/containers all the way up to the brim – basically don’t do it like how I’ve done in the photos). Leave at least 5 cm of space.

>> The reason for this is that during the fermentation period, the kimchi & liquid will expand. And if you’ve filled the containers to the brim, you will end up with leaking jars + a pool of kimchi juice. Believe me – fearfully opening bubbling, leaking, pressurised, CO2 filled jars is NOT fun. Been there, done that.

12. Top the jars/containers with clean, dry lids.

>> {optional} For jars, I cut out squares of baking paper (like pictured) and place them over the mouth before sealing. For containers, I use cling wrap.

13. Place in a clean, dry space at room temperature away from direct sunlight. Leave to ferment for at least 36 hours. Each day it ferments, open and press down with a clean, dry spoon to release the building pressure and to ensure the kimchi is immersed in liquid. A sign of good fermentation are the bubbles you will see when you press down.

>> Note that the longer you ferment the kimchi, the more intense and tangier flavour you will obtain. I like a strong tangy/sour flavour, so I choose to ferment the kimchi for at least 48 hours.

14. After fermenting the kimchi at room temperature for at least 36 hours, transfer to the refrigerator.

15. ENJOY! Homemade cruelty free kimchi in sushi rolls, in fried rice, in noodle soup, as a pancake or even just as a side dish. 😋😋

photo 3-1photo 4IMG_0130photo 2-1photo 1-2photo 1-1

Notes

  • For a less spicy kimchi, use ½ cup or ¾ cup of korean hot pepper flakes to one napa cabbage/wombok
  • For a less tangy/sour kimchi, ferment the kimchi for only the minimum time (36 hours)