Cakey Chunky Chocolate Cookies (VG)

Not crisp. Not chewy.

Cakey = Soft, light, moist & crumbly.

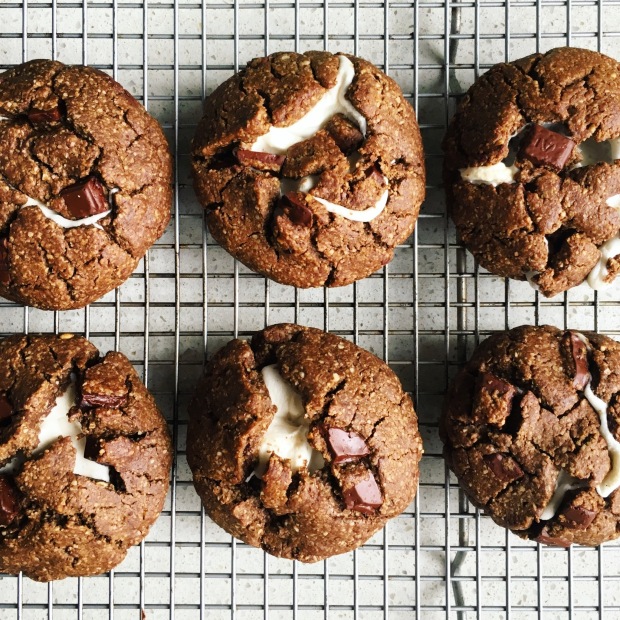
These cookies are sweet & chocolately with a cakey texture – very much like a classic brownie. The chunks of chopped dark chocolate provides chocolately accents throughout the cookie, while the roasted almond butter gives the crumb a slightly nutty flavour. ❤

Be generous with the chopped chocolate (or chocolate chips). They’re called chocolate cookies for a reason!

I used Lindt 70% dark chocolate. But you could use whatever vegan chocolate you prefer.

Also, did I mention this is a one bowl recipe? Less time spent cleaning – more time spent relishing in the sweet chocolate smell that will waft around your kitchen. 😛

This recipe is based on my Vegan Marshmallow Stuffed Chocolate Cookies (check that recipe out if you want something more decadent).

But if you just want a jarful(s) of tasty chocolate cookies, check out the recipe below!

IMG_0181IMG_0182IMG_0178IMG_0179IMG_0183IMG_0180Simplicity: 4.5/5     Deliciousness: 4.5/5     Nutrition: 3/5

Ingredients

Makes 24 medium sized cookies – more if you make mini sized ones

WET INGREDIENTS

  • 2 flax eggs (2 tbsp ground flaxseed + 6 tbsp water)
  • 1 cup brown sugar
  • 1/2 cup roasted nut butter (I used almond)
  • 1/2 cup coconut oil (solid, not liquid/melted)
  • 1 tsp vanilla bean paste or extract
  • 4 tsp plant based milk (I used unsweetened almond milk)

DRY INGREDIENTS

  • 1 tsp baking powder
  • 3/4 tsp baking soda
  • 3/4 tsp himalayan pink salt
  • 1/4 cup cacao powder
  • 3 cups gluten free oat flour (oats blended into a fine powder)
  • 80 grams / 3/4 cup of vegan dark chocolate (chopped) or vegan chocolate chips

METHOD

  1. Preheat oven to 176 degrees Celsius and line 2 large baking trays with baking paper.
  2. Place all the wet ingredients in a large mixing bowl. Then, using a handheld electric mixer, process the ingredients until smooth.
  3. Add the baking powder to the mixture and process until well combined. Repeat this process for each of the dry ingredients (except for the chocolate). The cookie dough should be moist but not super sticky.
  4. Roughly chop the chocolate (not too small!) and add to the bowl. Process the dough once more to mix the chocolate through.
  5. Using a spoon, scoop the cookie dough (1 large tablespoon-ful = medium sized. 1/2 tablespoon-ful = mini). Next, using your hands, roll the dough into a ball and then flatten to approximately 1cm thickness.
  6. Repeat this process for the rest of the dough. You can pick out the bigger pieces of chocolate to press into the top.
  7. Before baking in the oven, ensure the cookies are well spaced out on the tray – they will expand during the cooking process.
  8. If you shaped mini discs of dough, bake for 10 – 12 minutes. If you shaped medium sized discs of dough, bake for 14 – 16 minutes.
  9. Allow the cookies to cool on the baking tray for 5 minutes before transferring to cooling rack for another 10 minutes.
  10. ENJOY!  😊

Spiced Spelt Apple Tart (VG)

Sweater weather has arrived! The weather has turned chilly thanks to the change in seasons.

Just like how I crave cold & refreshing foods in hot weather, this cold weather has got me craving something warm and sweet! Well then, what should I make? Hmm…

Well also thanks to the change in seasons, apples are in season now! Recently I bought a box of granny smiths because they were so cheap; over 60+ apples/box for $20.

I LOVE granny smith apples; their sour but slightly sweet taste, their juicy & crisp texture & their gorgeous green shade. 💚

How about a Vegan Apple Tart with a Spelt-Oat Crust?
Slightly sweet & sticky cinnamon-ny apples with a crispy & nutty wholemeal base ~

Serve it WARM with a scoop of cold & creamy vegan ice cream

Mhmmmmm! Who wants a slice??

I used a 9-inch non stick round tart pan with a removable bottom. The removable bottom is absolutely perfect for taking the tart out of the mold without cutting, flipping or crumbling.

Even tried making it pretty by arranging the sliced apple like a flower – Do you see it?

The standard apple tart typically contains butter, milk, eggs & caster sugar. No thanks!

My twists: organic spelt flour, oat flour, coconut oil & coconut sugar.

A wholesome treat that’s healthier than your average apple tart!

IMG_0110

IMG_0109IMG_0108Simplicity: 3.5/5     Deliciousness: 4/5     Nutrition: 2.5/5

Ingredients

Spelt-Oat Crust

  • 1 cup lightly packed spelt flour
  • 1 cup lightly packed oat flour (Oats blended into a fine powder)
  • 1/4 tsp himalayan pink salt
  • 1/4 tsp cinnamon
  • 3 tbsp coconut sugar
  • 1/4 cup melted coconut oil
  • 3 tbsp water

Spiced Apple Filling

  • 3 medium sized granny smith apples
  • 1 tbsp coconut oil
  • 1 1/2 tbsp coconut sugar
  • 1/4 tsp cinnamon

Sliced Apple

  • 3 medium sized granny smith apples
  • 1 1/2 tbsp lemon juice
  • 1 1/2 tbsp coconut sugar
  • 1 1/2 tsp cinnamon
  • 2 tbsp pure maple syrup (for brushing)

Method

Crust

  1. Preheat the oven to 176 degrees Celsius.
  2. In a medium sized mixing bowl, mix the spelt flour, oat flour, salt, cinnamon & sugar. Then stir in the melted coconut oil & water until the mixture is moistened and starts to come together.
  3. Using coconut oil, lightly grease a nonstick tart pan (with a removable bottom).
  4. Scoop the mixture into the tart pan. Using clean & dry hands, press the mixture down across the base and along the sides of the tart pan. Do this until you are happy with how even and compact your crust is – make sure there aren’t gaps in the crust base.
  5. Using a fork, prick the base of the crust all over (see photos). This will prevent the crust from bubbling.
  6. Bake for 10 minutes. It will be a little firm (but delicate). Carefully set aside.

Filling

  1. Peel the skin of all 6 granny smith apples.
  2. Dice 3 apples into medium sized chunks. Remove the core and all seeds.
  3. Heat up a non stick pan. When the pan is hot, add the diced apples. Stir. After 1 minute, add the coconut oil, coconut sugar and cinnamon. Stir.
  4. Let the apples cook & caramelise for 1-2 minutes. Then turn off the heat and set aside to cool. You want to avoid cooking them for too long to keep some form of ‘bite’.
  5. Scoop and spread the diced apples into the tart pan.

Slices

  1. Slice the remaining 3 apples to medium thickness. You don’t want slices that are too thin as it may burn (as you can see from the photos). I quarter the apple, remove the core/seeds and then cut it into slices.
  2. Place the apple slices into a medium sized mixing bowl. Add lemon juice, coconut sugar and cinnamon. Mix well.
  3. Arrange the apple slices on top of the diced apple filling however you like. I attempted to arrange/layer them like a flower.
  4. Bake for 40 minutes – until the apples are tender + crust is golden.
  5. Remove from the oven. Place onto a cooling rack. Gently brush the maple syrup over the apples while it is still hot.
  6. Let the tart cool for at least 15 minutes. Carefully remove from the tart pan. Slice & serve warm with a scoop of vegan ice cream.
  7. ENJOY!!


Vegan Anzac Biscuit Bears (VG, GF)

SWEET, CHEWY + CRISPY EDGES 🐻 🍪 🐻 🍪

I decided veganise, healthify + cute-tify an Aussie classic: Anzac Biscuits 🇦🇺

The biscuits themselves are vegan, gluten free & refined sugar free 🌿
Instead of brown sugar or caster, I used organic coconut sugar.
Instead of butter, I used organic unrefined coconut oil. 🌴
Instead of golden syrup, I used raw organic agave syrup. 🍯

The rolled oats & coconut really give a lovely, chewy texture that’s quite addictive! (I’ve eaten 3 of these biscuits in one sitting already #biscuitbelly)

Their expressions were kind of inspired by one of my childhood favs: Tiny Teddies. I always enjoyed biting off a limb at a time (kind of morbid now that I think about it). I always saved the ‘hungry’ & ‘grumpy’ teddies for last.

I’ve always loved adorable/chibi/kawaii/anime-like things >> you can probably tell from the bear’s expressions 😂

The preparation and baking time for these Anzac biscuits is actually really quick (less than 20 minutes).

The process that takes the most time is icing/decorating the biscuits; you need to wait for the cookies to cool completely before carefully piping the feature + delicately drawing all details with a toothpick.

If you don’t have the time to draw such details, or if you simply do not want to, I suggest using vegan chocolate chips (for the ears, eyes & nose). Or if you can’t bear to spend time shaping the biscuit mixture into teddy bear shaped heads, simply shape the mixture into the typical circular cookie shape instead (it just won’t be as adorable!).

Either way, these Anzac Biscuit Bears are a great snack for kids & adults alike!

IMG_0068IMG_0065IMG_0070 (1)IMG_0063 (1).jpgIMG_0079halay.pngIMG_0069Simplicity: 4/5     Deliciousness: 4.5/5     Nutrition: 3/5

Makes 12

Ingredients

  • 1 cup gluten free plain flour
  • 1 cup rolled oats
  • 3/4 cup desiccated coconut
  • 1/2 cup coconut sugar
  • 1/2 cup unrefined coconut oil
  • 3/4 tbsp agave syrup
  • 2 tbsp water
  • 1/2 tsp bicarb soda

Method

Biscuit

  1. Preheat oven to 170 degrees Celsius. Line a large tray with baking paper.
  2. In a large bowl, sift the flour. Then add the oats, desiccated coconut & sugar and mix.
  3. In a small pan, melt the coconut oil over low heat. When the coconut oil has liquified, add the agave syrup & water. Then, remove from the heat and add the bicarb soda. Stir well.
  4. Pour the mixture into the dry ingredients. Mix together with a wooden spoon until well combined.
  5. With clean hands, scoop about 1.5 – 2 tablespoons of the mixture and shape into ‘teddy bear heads’; Start with an oval face before adding two large pea shaped circular ears. The biscuit dough should be about 0.5 – 1 centimetre thick (The thinner, the crispier. The thicker, the chewier.) Note: If you choose to shape them thicker, you will end up with less than 12 biscuits.
  6. Bake for 15-17 minutes (15 for a softer & chewier texture. 17 for a crunchier biscuit with a chewy middle & crispier edges).
  7. Carefully remove the biscuit bears from the hot baking tray onto a wire rack to cool.

Icing

Ingredients

  • 1/2 cup pure icing sugar (gluten free)
  • 2 tsp+ plant based milk
  • raw cacao powder

1. In a small bowl, mix the pure icing sugar and plant based milk with a spoon until well combined.

The consistency of the icing you are aiming for is smooth + very very thick (like refrigerated spreadable butter/margarine) – but not so thick that it just clumps & sticks to the spoon – it should still slowly run off the spoon).

If it is too thick, simply add a couple drops of plant based milk + mix until you are happy with the consistency. If it is too thin, you will need to add more pure icing sugar. So be careful. You do not want to end up with too much leftover icing.

2. Using a small bamboo skewer/toothpick, ‘scoop’ up the icing mixture and dollop/draw on the details (ear holes, eyes, brows, snout, whatever you want). If you/re confused about the features I’m describing, I’ve labelled them in a photo above.

I use a bamboo skewer (instead of a piping bag) as it is easier to manipulate the mixture into circles or lines + draw finer details = less icing on the biscuit.

3. The final detail is the nose (small brown bit on the snout). Add the cacao powder a teaspoon at a time to the remaining icing mixture. Add and mix until you reach your desired shade of brown.

You may need to add a couple drops of plant based milk if the cacao icing becomes too dry/clumpy. Lightly poke the ‘snout’ of the teddy bear to check if it has dried enough for you to draw on top. Use a bamboo skewer to delicately dollop and draw the final detail.

4. ENJOY!! 🐻 🍪 🍪 🍪

Vegan Quiche Puff Pastry Rolls (VG)

Vegan puff pastry rolls stuffed with noochy tofu. tomato & silver beet 🌿✨
the filling consists of crumbled firm tofu, fresh tomato, wilted silver beet, nutritional yeast, almond milk, dried mixed herbs, salt & pepper >> crispy, flaky, creamy & cheesy 👅💦
These unexpectedly ended up tasting like a quiche (weird right?) ~ hence the name. 😉

Btw these will only take 30 minutes (15 min prep, 15 min baking time)!

So if you’re heading to a party or just feel like a tasty savoury snack, you’ll be able to enjoy these in no time!

If you’re not sure what silver beet is, it is also called swiss chard or spinach beet. It’s become one of my favourite vegetables to eat as it is soooo easy to cook & naturally delicious. Plus its stems also comes in various colours: white, yellow, red & pink (it’s a rainbow!). 🌈

A vegan reimagining of a quiche + the classic vegetarian combination of feta & spinach. 🙌🏼

Truly simple and delicious ~ 💛

photo-1-3photo-2-2img_8086Simplicity: 4.5/5     Deliciousness: 4/5     Nutrition: 3/5

Ingredients

  • 300g firm tofu
  • 6 large stalks of silver beet
  • 4 tbsp nutritional yeast
  • 1/4 cup plant based milk
  • 2 tsp dried mixed herbs
  • 1 large tomato
  • salt & pepper for seasoning
  • 2 sheets of frozen vegan puff pastry
  • white sesame seeds (for sprinkling)

Method

  1. Preheat oven to 225 degrees Celsius. Line two trays with baking paper.
  2. Wash the tofu and place in a large mixing bowl. Then, using your hands, crumble the tofu. Set aside.
  3. Wash tomato. Roughly dice into small-medium sized pieces. Set aside.
  4. Wash the silver beet. Then roughly dice the stems of the silver beet into small square shapes. The leaves can be chopped into larger pieces.
  5. Heat up a pan. Add half of the silver beet you just chopped. Stir. When you start to see the silver beet softening, add a splash of water and cover with a lid. The stems of the silver beet should be tender but still have a ‘bite’. Remove from the pan and add to the tofu. Repeat this step for the remaining silver beet.
  6. Mix the silver beet and tofu. Add the nutritional yeast, plant based milk, herbs & tomato. Mix. Add salt and pepper to taste (don’t worry – tofu can be eaten raw).
  7. Slice the two sheets of vegan puff pastry in half.
  8. Scoop the filling in the middle of the pastry. Gently but firmly roll to form a long sausage-like shape. Slice the roll into 5-6 smaller pieces. Repeat for remaining filling.
  9. Place the rolls onto the trays – leave space between so that they do not touch (the pastry won’t cook evenly if they do touch). Sprinkle white sesame seeds on the top.
  10. Bake for 15 minutes until golden brown.
  11. ENJOY! 😊

Vegan Marshmallow Stuffed Chocolate Cookies (VG, GF)

What happens when you stuff a cookie with chocolate chunks with marshmallows?

CHEWY, OOEY GOOEY GOODNESS  ♥

I’m haven’t got a major sweet tooth (more of a savoury person), but I have been smashing these all day (only 3 left gahh what to do)! The combination of sweet, melted marshmallows with chewy/crispy-edged cookies & warm chocolate chunks is IRRESISTIBLE ! !  😘  😘

What makes these even better, is that these cookies are healthier than your average store bought, supermarket cookies. 😏

I purposely made the cookie dough batter less sugary than the typical vegan cookie recipes as the marshmallows themselves are quite sweet.

Also, this is a one bowl recipe = less dishes to wash (who doesn’t love that)!

Being vegan means you can’t enjoy cookies, chocolate and marshmallows. Being vegan means you can wholly enjoy cookies, chocolate and marshmallows that are dairy free + gelatin free because they do not contribute to the suffering of animals. 🐮 🐷 🐔

Dairy is unnecessary & unethical while gelatin is distasteful (boiled animal skin, tendons bones? No thank you!).

Thanks to the growing demand for cruelty free foods, there are many types of vegan chocolates and marshmallows available – Use what is most accessible to you 😄

Please note that while I used cashew butter, you can use other types like almond butter or sunflower seed butter (using this will make this recipe nut free).

Also note that the melted marshmallows will solidify again when the cookies cool down. So if you are unable to enjoy the cookies fresh out of the oven, just pop the cooled cookies into the microwave 😉  10 seconds will give you warm chocolate cookies + stretchy, ooey gooey marshmallows  😋

Seriously, this is one sweet & stretchy treat you got to try  😜

IMG_0115IMG_0113IMG_0111IMG_0114IMG_0112Simplicity: 4/5     Deliciousness: 4.5/5     Nutrition: 2.5/5

Makes 8 large cookies

Ingredients

Wet Ingredients

  • 1 flax egg (1 tbsp ground flaxseed + 3 tbsp water)
  • 1/3 cup coconut sugar
  • 1/4 cup cashew butter
  • 1/4 cup coconut oil (solid, not liquid/melted)
  • 1/2 tsp vanilla extract
  • 2 tsp plant based milk (I used unsweetened almond milk)

Dry Ingredients

  • 1/2 tsp baking powder
  • 1/2 tsp baking soda
  • 1/2 tsp himalayan pink salt
  • 2 tbsp cacao powder
  • 1 ½ cup gluten free oat flour (oats blended into a fine powder)
  • 32 grams vegan dark chocolate (I used 2/5 Alter Eco Dark Chocolate Bar)
  • 1/2 cup vegan mini marshmallows (I used Dandies)

Method

  1. Preheat oven to 176 degrees Celsius and line a large baking tray with baking paper
  2. Place all the wet ingredients in a large mixing bowl. Then, using a handheld electric mixer, process the ingredients until smooth
  3. Add the baking powder to the mixture and process until well combined. Repeat this process for each of the dry ingredients (except for the chocolate & marshmallows). The cookie dough should be moist but not super sticky
  4. Roughly chop the chocolate and add to the bowl. Process the dough once more to mix the chocolate through
  5. Using a spoon, scoop the cookie dough. Next, using your hands, roll the dough into a ball and then flatten to approximately 1cm thickness. Repeat this process until you have 16 discs
  6. Place 8 of the discs of cookie dough onto the baking tray. Then place 7 vegan mini marshmallows in the middle of each disc
  7.  Place the remaining 8 discs on top. Then, one by one, press together the discs of dough until the marshmallows are completely covered
  8. Before baking in the oven, ensure the cookies are well spaced out on the tray – they will expand during the cooking process
  9. Bake for 12 minutes
  10. Allow the cookies to cool on the baking tray for 5 minutes before transferring to cooling rack for another 10 minutes
  11. ENJOY!  😊

Ultra Fudgy Vegan Bean Brownies (VG, GF)

BEANS + BROWNIES = ULTRA FUDGY BROWNIE BLISS ❤ ❤

If you like DENSE, CHEWY, MOIST, FUDGY brownies, this recipe is for you 😉

And when I say fudgy, I mean FUDGY 😛

Seriously, these will not disappoint. I do not have a sweet tooth but I have tested these thrice and am happily suffering from brownie belly – yes that is a thing ahahaha!

oh and these brownies are also vegan, gluten free, nut free, refined sugar free and oil free   🙂 🙂

The ingredients I used are easily accessible (your local supermarket or health food store should stock them) + there is no special equipment needed (measuring cups/spoons,  a 9×9 nonstick square pan, a blender and a mini spatula) and the process itself is super simple (measure, blend, spread, bake, slice).

The moistness of these brownies also keep really well for a couple of days. The third image is actually a photo of the brownies on the 3rd day since they were first baked!

I baked a batch on a Monday, stored them in an airtight container and delighted in their ultra fudgy texture everyday til Friday!

♥ A brownie a day keeps your chocolate cravings away!

IMG_1948IMG_1947IMG_2035Simplicity: 4/5     Deliciousness: 4/5     Nutrition: 3/5

Makes 16

Brownies

Ingredients

  • 1½ cup canned white cannellini beans
  • 1 ½  cup pure maple syrup
  • 8 tbsp unsweetened applesauce
  • 3 tsp baking powder
  • 2 tsp vanilla extract
  • 1/2 tsp himalayan pink salt
  • 2 cups oat flour (basically gluten free oats blended into a fine powder)
  • 1 cup raw cacao powder

Method

  1. Preheat oven to 176 degrees celcius
  2. Open the can of white cannellini beans, pour them out into a strainer ans rinse thoroughly to remove the residue. Then pat them dry and measure out the amount needed.
  3. In a blender/food processor, add the beans, maple syrup, apple sauce, baking powder, vanilla and salt – process the ingredients together until well combined.
  4. Add and stir the oat flour through the mixture (this will help combine the wet & dry). Then blend until well combined.
  5. Add and stir the cacao powder through the mixture. Blend until well combined. The final mixture should be smooth and slightly thick.
  6. Pour the mixture into your pan. Use a spatula to even spread the mixture and to scrape all that brownie batter goodness out of your blender/food processor.
  7. Firmly tap your pan on the counter several times to remove any air bubbles.
  8. Bake for 25 minutes.
  9. Remove from the oven and allow the brownies to cool for 15 mins. Then remove the slab from the pan and allow to cool for another 15 minutes on a cooling rack. Allowing the brownies to cool gives them time to firm up and not cutting into them straight away prevents them from drying out.
  10. Slice and decorate with toppings of choice (I used coconut flakes, cacao nibs and a vegan chocolate drizzle).
  11. Store refrigerated in an air tight container or serve immediately.
  12. ENJOY!!


Vegan Chocolate Drizzle

Ingredients

  • 1 tbsp coconut oil
  • 1 tbsp raw cacao powder
  • 1/2 tbsp liquid sweetener (pure maple syrup or agave syrup)
  • tiny pinch himalayan pink salt

Method

  1. In a small pot, melt the coconut oil on the stove on low heat
  2. When the coconut oil has liquified, add the cacao and whisk well
  3. When the cacao is well incorporated, add the sweetener & salt and whisk well
  4. Remove the pot from the stove and turn off the heat
  5. Allow mixture to cool for 3 minutes (it will thicken slightly) before drizzling


Homemade Vegan Crispy-Crust Pizza (VG)

Pizza  ❤

Fun to make, fun to eat & fun to share  😀

While store bought pizza bases are okay + convenient, I am never buying them ever again! Homemade is just TOO GOOD  🙂

Fresher, crispier, fluffier, tastier, healthier  ❤

Plus it’s waaaay cheaper – $10 worth of bread flour goes a long way! Unfortunately now I find paying $20 for a pizza absolutely ludicrous! It’s the Asian in me  😮 XD

Vegan pizzas can be INCREDIBLY FLAVOURFUL, TEXTURAL + FRESH  😛 Use a variety of toppings for a mouth partaay  😉 My favourite toppings include homemade pesto, sliced potatoes, celery, zucchini, mushrooms and olives!

I should also say that while I tried giving a clear & concise explanation of how to stretch the dough by hand, i would recommend you also watch some videos for visual reference. Just type in ‘How to stretch pizza dough by hand’; follow/use the techniques that make the most sense to YOU.

Now scroll and salivate!  😀

IMG_7016IMG_9483[1]IMG_9484[1]Simplicity: 3.5/5     Deliciousness: 4.5/5     Nutrition: 3/5

Makes 8 small sized pizzas

(Depends on how you divide the dough)

Dough

Ingredients

  • 6 ½ cups bread flour
  • A little less than 2 ¼ cups of warm water
  • 1 tsp instant dried  yeast
  • 2 ½ tsp salt
  • 3 tsp olive oil

Method

  1. Pour the warm water into a large mixing bowl
  2. Add the yeast and stir for a minute. Then add the salt and stir until dissolved.
  3. Add the flour (sifted) to the mixture – 1 cup at a time. Mix with a wooden spoon until the flour is completely incorporated. Do not worry if you have little bits of detached dough – the oil+kneading will help bring everything together.
  4. Add oil and knead for 5 minutes.
  5. Divide the dough into 8 equal pieces and gently shape them into balls (If you want to make larger sized pizzas, divide the dough into 4-6 equal pieces).
  6. Place the balls of dough individually or in pairs in greased medium sized containers or sandwich bags. Store them in the refrigerator for at least 24 hours (one day) but no more than 120 (5 days). (This is called a Cold Rise. This form of fermentation is most appropriate for allowing the yeast to mature = deeper flavoured, bubblier crust.)

Pizza

Ingredients

  • 1/2 cup bread flour
  • 1/2 cup cornmeal or raw polenta
  • 1 tbsp olive oil + oil brush
  • toppings of choice
  1. When your pizza cravings have peaked, preheat the oven to 260 degrees Celsius (500 degrees Fahrenheit)
  2. Remove your dough balls within 30 minutes of baking to allow them to come to a warmer temperature.
  3. Lightly flour a flat, dry surface. Take a ball of dough and place it in the middle. Then lightly flour the top of the dough.
  4. Press down the dough with clean, dry, stiff fingertips to shape and flatten the dough into a disk. This will remove majority of the air from the dough.
  5. Place your fingers in the centre and use them to pull the dough outwards in opposite directions. Slightly rotate the dough in a clockwise direction after each stretch to maintain a consistent circular shape.
  6. Pick up the dough along the edge and hold it between your thumbs and fingers. Keep your thumbs approximately 2-3 centimetres from the edge. Steadily and gently pull the dough with your fingertips as you turn it in a clockwise direction. Doing this naturally allows gravity to stretch the dough thinner = crispier crust.
  7. Evenly oil your tray with olive oil. Then sprinkle a moderate amount of cornmeal or raw polenta all over the tray. This step ensures a crispier crust + cooked base that will not stick to the tray. (You can choose to use baking paper instead for an oil free pizza – however the base may not be as crispy).
  8. Gently place the dough onto the tray. If there are any tears in the dough, simply lightly pinch & press it to close the hole.
  9. Add your sauce, toppings and seasonings of choice.
  10. Place in the oven and bake for 10 minutes (for a softer, chewier crust) or for 15 minutes (for a browner, crunchier crust).
  11. Repeat steps 3-10 for other balls of dough (or you could save them for another day  😉 ).
  12. Let the pizza rest for 5 minutes before slicing (learn from my mistake – you do not want to burn the roof of your mouth  XD )
  13. ENJOY!!  😀


Dark Chocolate Hot Cross Buns (VG)

Earthy, bittersweet. A hot cross buns for adults. 🙂

I was munching on my mini raisin hot cross buns when i imagined a chocolate version. I salivated at the thought! 😀 😛

The thought became action and voila – fresh, fluffy, vegan dark chocolate hot cross buns.

These hot cross buns are VEGAN, REFINED SUGAR FREE & PRESERVATIVE/ADDITIVE FREE. 😉

IMG_9867[1]

Simplicity: 4/5     Deliciousness: 4/5     Nutrition: 3/5

Ingredients

DOUGH

  • 3/4 cup plant based milk
  • 2 tsp dried yeast
  • 5 tbsp coconut sugar
  • 1/4 cup melted vegan butter or margarine
  • 2 ¾ cups plain flour
  • 2 tbsp raw cacao powder
  • 1 ½ tsp mixed spice
  • 2/3 cup vegan chocolate (I used Loving Earth Coconut Mylk 80g)
  • pinch of salt
  • coconut oil (for oiling the bowl & loaf tin)

CROSS

  • 1 tbsp plain flour
  • 1 tbsp raw cacao powder
  • 3 tbsp plant based milk

GLAZE

  • 1/2 tbsp coconut oil
  • 1/4 tbsp coconut sugar

METHOD

  1. In a small saucepan, heat up the plant based milk for the dough until lukewarm (it should definitely be warm but cool enough to touch).
  2. Once lukewarm, pour the plant based milk into a bowl. Add the yeast and mix. Then add 2 tbsp coconut sugar and mix well.
  3. Set aside for 5 minutes or until the mixture is frothy.
  4. Add the melted vegan butter or margarine and whisk until well combined.
  5. In a large bowl, sift the plain flour and cacao powder. Then dice the vegan chocolate and add to the bowl.
  6. Add the mixed spice, salt & 3 tbsp coconut sugar. Stir well.
  7. Make a well in the centre of the dry mixture. Then pour the wet mixture in. Mix with a wooden spoon until well combined (the dough will be rather crumbly).
  8. Lightly flour a clean, dry surface and then scoop out the dough. Using your hands, knead the sticky dough for approximately 5 minutes or until it becomes a smooth dough. Roll the dough in a ball.
  9. Oil a large bowl with coconut oil. Place the ball of dough in cover with a damp tea towel. Place in a warm space for an hour to rise (the dough will double in size).
  10. Once the dough has doubled in size, punch the air out. Then take the dough out of the bowl and knead for 2 minutes on a clean surface until smooth.
  11. Divide the dough into 8 even sections and roll into balls.
  12. Preheat the oven to 190 degrees Celsius.
  13. Oil a loaf tin/mini bread tin with coconut oil. Then place the balls of dough in. Lightly push them down to make them fit snugly together.
  14. Cover the tin with a damp tea towel and place in a warm space to rise for 10 minutes.
  15. While waiting for the second rise, whisk your cross mixture together in a small bowl until smooth.
  16. Fill a small piping bag or rolled up baking paper with the cross mixture. Pipe the mixture onto the dough in a cross shape.
  17. Place the tin into the oven. Bake for 20 minutes. The tops of the buns will be hard and brown.
  18. While waiting for the buns to bake, whisk your glaze mixture together until smooth.
  19. Remove your hot cross buns from the oven. Using a pastry brush, glaze the tops of the buns – you will need to do this several times.
  20. Serve immediately. ENJOY! 😀

Mini Raisin Hot Cross Buns (VG)

Hot cross buns – a childhood favourite of mine 😀 I remember my mum always buying a six-pack around Easter and me wolfing them down in the car after school.

Recently my little brother (he’s in Year Two) asked me to buy some hot cross buns for him. I nonchalantly picked up a pack and started to read the ingredients… I was SHOCKED with the long list of ingredients the supermarket used to bake their ‘traditional, fresh & healthy’ hot cross buns; Additives [emulsifier (471)], Gelling Agents (440, 407, 415), Colouring, Dairy (milk, eggs) & much more. 😮 😮

I had no idea what most of the listed ingredients were – they just sounded very unnatural and processed. Not something I want to give others or nourish my body with.

Fortunately, hot cross buns are actually really easy to make! This was my first time baking bread that needed to rise in a warm place. You will spend most of the time just waiting for the dough to rise 😉

After doing some research and experimenting in the kitchen, I have ended up with a simple recipe for truly FRESH, SOFT & FLUFFY HOT CROSS BUNS ❤

Because these hot cross buns have no additives, preservatives, chemicals or refined sugars, they will taste best immediately after baking 🙂 Now scroll down and enjoy!

IMG_0022IMG_0024IMG_0025IMG_0023Simplicity: 4/5     Deliciousness: 3.5/5     Nutrition: 3/5

Makes 8 mini hot cross buns

Ingredients

Dough

  • 3/4 cup plant based milk
  • 2 tsp dried yeast
  • 4 tbsp coconut sugar
  • 1/4 cup melted vegan butter or margarine
  • 2 ¾ cups plain flour
  • 2 ½ tsp mixed spice
  • 2/3 cup raisins
  • pinch of salt
  • coconut oil (for oiling the bowl & loaf tin)

Cross

  • 2 tbsp plain flour
  • 2 ½ tbsp plant based milk

Glaze

  • 1/2 tbsp coconut oil
  • 1/4 tbsp coconut sugar

Method

  1. In a small saucepan, heat up the plant based milk for the dough until lukewarm (it should definitely be warm but cool enough to touch).
  2. Once lukewarm, pour the plant based milk into a bowl. Add the yeast and mix. Then add 2 tbsp of coconut sugar and mix well.
  3. Set aside for 5 minutes or until the mixture is frothy.
  4. Add the melted vegan butter or margarine and whisk until well combined.
  5. In a large bowl, sift the plain flour. Then add the mixed spice, raisins, salt and 2 more tbsp of coconut sugar. Stir well.
  6. Make a well in the centre of the dry mixture. Then pour the wet mixture in. Mix with a wooden spoon until well combined (the dough will be rather crumbly).
  7. Lightly flour a clean, dry surface and then scoop out the dough. Using your hands, knead the crumbly dough for approximately 5 minutes or until it becomes a smooth dough (raisins will inevitably fall out of the dough – just stick them back in whenever they do). Roll the dough in a ball.
  8. Oil a large bowl with coconut oil. Place the ball of dough in cover with a damp tea towel. Place in a warm space for an hour to rise (the dough will double in size).
  9. Once the dough has doubled in size, punch the air out. Then take the dough out of the bowl and knead for 2 minutes on a clean surface until smooth.
  10. Divide the dough into 8 even sections and roll into balls.
  11. Preheat the oven to 190 degrees Celsius.
  12. Oil a loaf tin/mini bread tin with coconut oil. Then place the balls of dough in. Lightly push them down to make them fit snugly together.
  13. Cover the tin with a damp tea towel and place in a warm space to rise for 10 minutes.
  14. While waiting for the second rise, whisk your cross mixture together in a small bowl until smooth.
  15. Fill a small piping bag or rolled up baking paper with the cross mixture. Pipe the mixture onto the dough in a cross shape.
  16. Place the tin into the oven. Bake for 20 minutes. The tops of the buns will be hard and brown.
  17. While waiting for the buns to bake, whisk your glaze mixture together until smooth.
  18. Remove your hot cross buns from the oven. Using a pastry brush, glaze the tops of the buns – you will need to do this several times.
  19. Serve immediately. ENJOY! 😛

Seeded Wheatgrass Pretzels (VG)

I LOVE PRETZELS 😀

The unique malty taste, the fresh & fragrant smell, the fluffy yet crisp texture ❤

I’m just salivating while thinking and writing about it 😛

So when I found out that my favourite pretzel place (basically the closest ahaha) closed down, I was totally devastated 😦 #firstworldproblemsmuch

I suffered from severe pretzel withdrawals during the great Pretzel Drought of 2013-2015.

However, hope (in the shape of a pretzel) returned when I googled “homemade soft pretzels bread flour easy” (took me long enough). Turns out its actually not that difficult to make your own vegan pretzels (plus it’s WAY cheaper) 😉

After experimenting with an array of pretzel recipes and using my family & friends as guinea pigs, I managed to refine my pretzel recipe to what it is today.

Below is one of my family’s favourites >> fluffy & green pretzels with crunchy, roasted seeds 💚

IMG_0356[1]IMG_0357[1]

Simplicity: 2.5/5     Deliciousness: 4.5/5     Nutrition: 3.5/5

Makes 8 (Approx.)

Ingredients

  • 1 ½ cups warm water
  • 2 ¼ tsp active dry yeast
  • 1 tsp salt
  • 1 tbsp coconut sugar or brown sugar
  • 3 – 4 cups bread flour
  • 4 tbsp wheatgrass powder
  • 1 tbsp agave syrup + 1/2 cup hot water = egg-free egg wash
  • 3 tbsp white sesame seeds
  • 3 tbsp black sesame seeds
  • 3 tbsp golden flax seeds
  • 1 tbsp melted vegan butter or margarine
  • salt for sprinkling

Method

Dough

  1. Dissolve yeast in warm water. Stir for 1 minute. Add salt; stir until fairly combined. Set aside for 5 mins (for the yeast to foam).
  2. Add the 4 tbsp of wheatgrass powder (sifted) and stir. Then, slowly add 3 cups of flour (sifted) – 1 cup at a time. Mix with a wooden spoon until dough is thick. Add at least 1/2 cup more flour until the dough is no longer sticky. Poke the dough with your finger – if it bounces back, it is ready to knead.
  3. Turn the dough out onto a floured surface. Knead the dough for about 5 minutes and shape into a ball.
  4. Place the ball of dough into a spacious bowl. Cling wrap the bowl.
  5. Store in the refrigerator for at least 8 hours but no more than 24. (This is called a Cold Rise. This form of fermentation is most appropriate for bread making in Winter.)

Baking

  1. Take out the dough – it should have risen & doubled in volume.
  2. Preheat the oven 200 degrees Celsius.
  3. Punch down the dough, knead it for 1 minute and shape into a ball. With a sharp knife, cut the ball of dough into 1/3 cup sections.
  4. Roll out the dough into a rope with an even diameter. Then, shape into a pretzel shape; from the straight rope ⇒ a U shape ⇒ bring together the ends and twist ⇒ place and press the ends on the curved part of the U shape
  5. (Optional) Whisk 9 cups of hot water & 1/2 cup baking soda together in a large pot. Place a pretzel onto a large slotted spoon & dip into the boiling water for 20-30 secs. The pretzel will float. Lift, allow excess to drip off & place onto a prepared tray lined with baking paper. Repeat with the rest of the pretzels. This process gives the pretzel a golden-brown exterior whilst keeping the inside fluffy.
  6. Dunk the shaped pretzel into the egg-free egg wash (both sides). This helps bind the pretzel. Place onto the prepared tray.
  7. Mix the flax seeds & sesame seeds together. Top the pretzels with the seed mix and season with salt.
  8. Bake for 10 mins.
  9. Take out the tray of pretzels at the 10min mark. With a pastry brush, lightly ‘butter’ the pretzels with the melted vegan butter or margarine.
  10. Place the tray back into the oven. Bake for another 5 min.
  11. ENJOY!! 😀