Creamy, savoury soft polenta with loads of textures & flavours!
I say ‘bowls’ but it really is served on a plate hahahaha.
First off – What is polenta?
Polenta: A dish of boiled ground cornmeal. It is soft when hot, firm when cooled.
I used to make vegetarian polenta fries that had heaps of salt, cheese & butter. It used to be my signature dish.
But after I chose to be vegan + eat more wholesomely, I’ve been trying to make a vegan version that surpasses the dairy-heavy version – This is it!!
Thanks to the nutritional yeast and miso, the polenta has a unique umani savoury taste that is quite cheesey and nutty.


The polenta’s ‘noochy’ flavour predominantly comes from the nutritional yeast. To be honest, if you are not a fan of the nutritional yeast flavour – you will probably dislike the taste of the polenta in this recipe.
But if you’re a fan of nooch, this is a recipe for you!
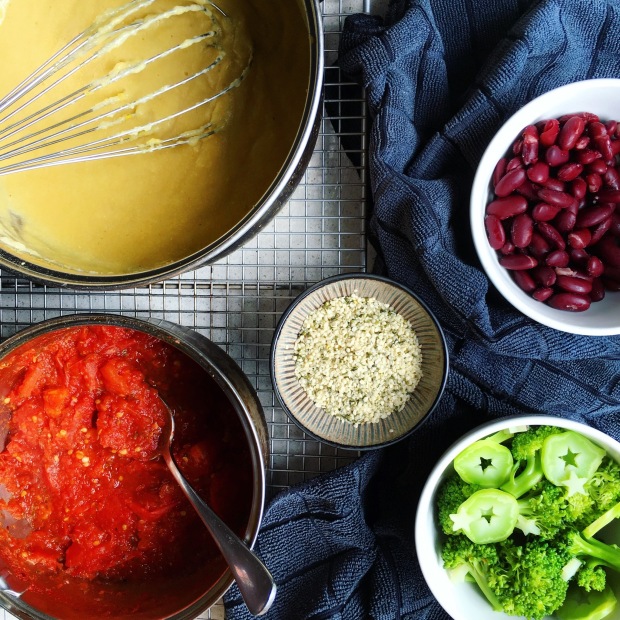
My choice of sides/veggies requires a bit of multitasking. I start with the potatoes > sauce > other sides > polenta.
Some of the components of this dish can be made ahead of time. But honestly you can use whatever vegetables or beans you prefer as the polenta pretty much goes with anything.
 Simplicity: 3/5 Deliciousness: 4/5 Nutrition: 4/5
Serves 2 large portions
Polenta
Ingredients
- 1/2 cup fine ground polenta (do not use coarse ground!)
- 1 litre+ boiling hot water
- 3/4 tsp+ himalayan pink salt
- 1/4 cup nutritional yeast flakes
- 1+ tbsp vegan butter
- 1/4 tsp+ dark miso paste or 1/2 tsp yellow miso paste
Method
1. Fill a medium sized pot with 1L hot water (I like to use a kettle to boil water as it speeds up the boiling process).
2. Slowly pour in the polenta, whisking constantly to prevent lumps. Turn the heat to medium.
3. Cook, whisking consistently, for about 15-20 minutes. Add more water (hot or cold doesn’t matter) when the mixture becomes too thick.
The polenta’s grainy texture will become smooth on the tongue when cooked. Take care during the cooking, as the polenta will bubble and spit (like lava). You do not want to burn yourself.
The consistency you are aiming for is like bottled tomato sauce/passata; smooth and slightly thick. Note that polenta thickens & solidifies as it cools down.
4. Seasoning time. Start with 1 teaspoon of salt and stir.
5. Turn off the heat. Whisk in the nutritional yeast, vegan butter & miso paste until dissolved. Taste. If you prefer it saltier + more buttery, season with more salt, miso paste or vegan butter to taste. Once you’re happy with the seasoning, set the polenta aside. It will thicken as it cools down.
Chunky Spicy Tomato Sauce
Ingredients
- 5 large juicy tomatoes
- 1 tsp chilli flakes
- 1 tsp mixed dried herbs
- pepper and salt
Method
- Chop the tomatoes into chunks. Add 3/5 of the tomatoes into a blender and process until smooth.
- Heat up a pot on low. Add the chopped tomato chunks into the pot and stir. After 1 minute, add the chilli flakes and stir. Then, pour the blended tomatoes into the pot. Stir & turn the heat up to medium.
- When the sauce starts to boil, add the mixed dried herbs, a couple rounds of cracked black pepper and 1/4 teaspoon of salt. Stir.
- Let the sauce bubble away to reduce to a thicker/chunkier consistency. This usually takes 15-20 minutes on medium-high heat. Stir the pot occasionally.
- When the sauce has reduced, taste. Add more seasoning to taste. When you’re satisfied with the consistency & flavour, turn off the heat and set the sauce aside.
Sides & Assembling
Ingredients
- 2 large potatoes
- 3/4 tbsp olive oil
- 2 sprigs of thyme
- 1 whole broccoli
- 1 can red kidney beans
- Hemp seeds hearts
Method
1. Preheat oven to 200 degrees Celsius. Line the tray with baking paper.
2. Wash and dry the potatoes.
To make hasselback potatoes: Place the flatter side of the potatoes on the chopping board. Make thin cuts/slices at 3mm intervals about two-thirds of the way down.
If you find it difficult to make the cuts, chopsticks or wooden spoons can aid the process. Place one on either side of the potato while you prep them.
If you can’t be bothered to make hasselback potatoes, just chop them into chunks, toss in olive oil + 1/4 tsp salt and bake until tender & golden.
3. Place the potatoes on the tray. Then, pour & rub the olive all over them. Break the sprigs of thyme into 1 inch pieces and randomly insert between the potato slices.
4. Place in the oven and bake for 45 minutes or until golden brown.
5. While the potatoes cook, prep the remaining sides. Wash & cut the broccoli into easy-to-eat pieces. Drain & rinse the canned beans.
6. Place a pot of boiling water on the stove. Pour the beans in and boil for 2 minutes. Use a strainer ladle to remove them from the water into a bowl.
Then place the broccoli in the pot and boil for 3 – 4 minutes, or until tender. When cooked, remove from the pot into a separate bowl. Set aside.
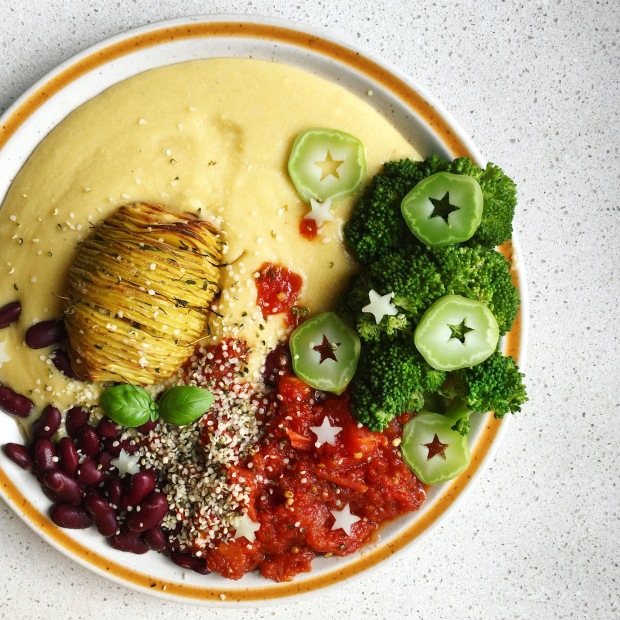
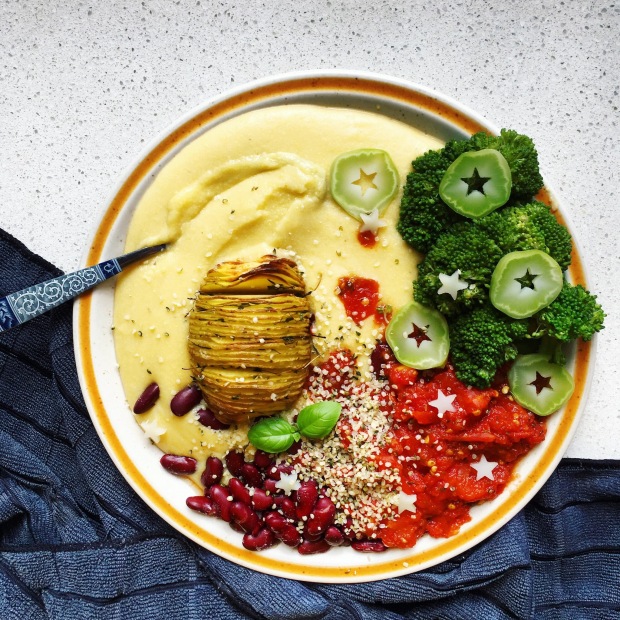
7. Set out large plates. Scoop on the soft polenta. Then the tomato sauce. Then the broccoli, kidney beans and potato. Finally, sprinkle some hemp seeds for some extra texture (and some extra plant based protein!).
8. ENJOY!!